

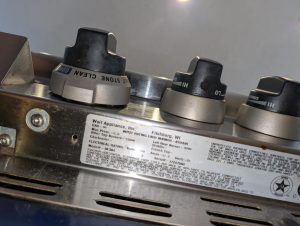
The customer in the Silver Springs community of NW Calgary called TechVill on a Wolf oven that had stopped heating — no bake, no broil, complete failure on both circuits. “No heat” is a long differential on a premium oven: it could be a failed bake element, a failed broil element, a failed convection element, a thermostat reporting a false temperature, a temperature sensor giving the controller bad feedback, a relay board not closing its outputs on command, or wiring degradation between any of those. Picking the most expensive plausible part and hoping is one way to handle it. Proving which part has actually failed is the other.
TechVill technician John worked the diagnostic by elimination. The story of this repair is the diagnostic itself.
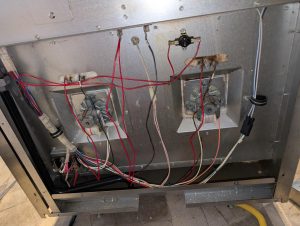
Step 1 — Confirm the supply and the elements
The first step on a “no heat” call is to test the elements themselves. If one of them is open-circuit, that is the failed component. If they all test good for continuity, the failure is somewhere upstream in the control or supply circuit.
John pulled access to the heating-circuit terminals and ran a continuity test through each element pair. All bake and broil elements tested good. Continuity readings were within spec across each leg. Both convection elements tested good. Bake and broil were retested as a final confirmation — still good.
That ruled out the most expensive single-part candidates first.
Step 2 — Megaohm test the wiring back to the board
Most appliance technicians stop at continuity. Continuity says current can flow through a component at low voltage on a meter. It does not say anything about whether the insulation around the wiring can hold at 240 V under operating load. A degraded insulation layer can leak current to ground, develop intermittent shorts, or cause arc-fault behaviour that looks like a “no heat” symptom even when every component the heat circuit drives is itself in working order.
To test that, John ran a megaohm insulation resistance test on the wiring runs back to the control board. A megohmmeter applies a high test voltage and measures the resistance of the insulation around the conductor. A healthy insulation reading is in the megohms — that is the spec. A degraded insulation reading drops by orders of magnitude and signals breakdown.
The megaohm test came back clean. Insulation integrity intact across the wiring runs back to the board. The heating circuit’s wiring was healthy.
Step 3 — By elimination, the relay board
With every element tested good, the wiring’s insulation tested intact, and the convection circuit’s elements verified healthy, the remaining candidate was the relay board itself. The board was not energizing the elements on command — even though every element it would energize, and every wire it would energize them through, was already known to be working.
That is the diagnostic result the methodology produced. Not “replace the most likely component and hope” — “prove which component has failed by ruling out the others first.”
The conclusion: Wolf relay board (part 807052) — failed, replacement required. No other parts in scope.
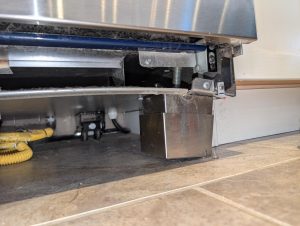
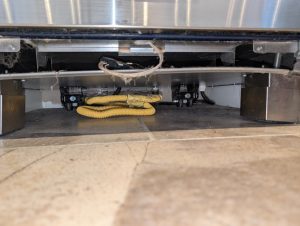
Step 4 — A separate finding worth documenting
While accessing the unit, John noticed a secondary condition — the feet riser system on the oven was askew. His professional read: someone had previously tried to level the unit and lifted one leg too far at a time, putting the riser system out of alignment. This was pre-existing damage from a prior service attempt, not anything caused by TechVill on this visit.
Documenting that in the work order does three things at once. It gives the customer an honest read on what was there before TechVill arrived. It protects the customer from a future “they damaged my oven” interpretation if the riser issue becomes more obvious later. And it gives the customer the option to address the alignment as a separate scope, on the customer’s terms, without bundling it into a quote they did not ask for. Same disclosure discipline TechVill applies on every case where pre-existing conditions are observed during service.
What this case demonstrates and what the customer paid
The diagnostic visit ran 30 minutes — compact given the multi-step electrical work involved. The diagnostic effort itself is what the customer paid for, and the result was a confident single-component diagnosis instead of a guess-and-check parts list.
Components ordered for the install visit:
- Wolf relay board (part #807052) — receives commands from the user controls and switches the heating elements on and off; the failed board on this unit was not energizing the elements on command despite every downstream component testing healthy
Total quoted: $888.30 ($846 + 5% GST), plus the diagnostic service call charged separately. The customer paid $819 CAD on this visit, covering the relay board parts cost, the parts handling, and the diagnostic service call with GST — math reconciles cleanly to $491 + $30 + $259 + 5% = $819. Balance due on install: $341.25 (the install labour line plus GST). The Wolf relay board ships through the manufacturer service channel with a typical five-day lead time.
This is the second documented Silver Springs / T3B area case in TechVill’s portfolio. The postal code covers Silver Springs along with Brentwood and several other mature NW Calgary residential corridors — the kind of established western inner-city housing stock that supports premium kitchen specifications. The previous T3B case was a mass-market refrigerator drain repair in Brentwood; this one is a premium-brand oven diagnostic. Different brand tiers, same documented coverage zone.
Need Wolf or Sub-Zero Service in Calgary?
TechVill services Wolf and Sub-Zero appliances across Calgary and surrounding areas. Our technicians arrive with the electrical test equipment and the manufacturer-spec parts to walk a heating-circuit failure end-to-end, including the megohm and continuity testing required to rule out alternatives before committing to a replacement.
Book online to schedule a Wolf oven diagnostic with our team.